FELIZ NAVIDAD Y PRÓSPERO AÑO 2014 os deseamos desde el IES Isaac Newton, on PhotoPeach
Tuesday, 17 December 2013
Happy Christmas!!!
This is the Christmas Digital Card used by our IES for everybody. You have made the tasks!!!!!
Monday, 16 December 2013
Your tasks: Snowflakes - Rotational symmetry
SMALL SNOWFLAKES on PhotoPeach
HUGE SNOWFLAKES on PhotoPeach


HUGE SNOWFLAKES on PhotoPeach
Everything was used in our Christmas carols contest at Assembly Hall's walls.
Wednesday, 11 December 2013
Discovering KIRIGAMI. Space with paper for CHRISTMAS
CHRISTMAS TREES
We are going to construct a pop-up Christmas Tree using another Japanese technique named Kirigami. It will be a good example of POSITIVE SPACE and NEGATIVE SPACE.


We are going to construct a pop-up Christmas Tree using another Japanese technique named Kirigami. It will be a good example of POSITIVE SPACE and NEGATIVE SPACE.
Here you will find the template to be downloaded:
Instructions. By Robert Sabuda.
We are going to use color paper and we will use them as hanging trees.


SNOWFLAKES


We are going to use color paper and we will use them as hanging trees.


SNOWFLAKES
6-pointed Paper Snowflakes instructions. This task will be a good example of polygons and rotational symmetry.


Friday, 6 December 2013
Doors
When students finish their tasks, they have been decorating our classrooms doors!
OUR DOORS - NUESTRAS PUERTAS on PhotoPeach
OUR DOORS - NUESTRAS PUERTAS on PhotoPeach
Wednesday, 4 December 2013
Plastic language OUT OF PAPER!!!!!
Now that we are working with PAPER (ORIGAMI TURKEYS)...
LI HONGBO
Li Hongbo demonstrating, how his paper sculptures work. from Dominik Mersch Gallery on Vimeo.
ANASTASSIA ELIAS
and now, ...
FORNITURE
And... using cardboard:
Using toilet paper and more things: Sakir Gokcebag, a turkish artist. Discover his artworks on his website.
LI HONGBO
Li Hongbo demonstrating, how his paper sculptures work. from Dominik Mersch Gallery on Vimeo.
ANASTASSIA ELIAS
Take the artistic talents of Anastassia Elias. Looking at an empty toilet paper roll one day, Anastassia was able to envision something more than trash. Using manicure scissors and tweezers, she creates scenes imitating the everyday lives of ordinary people and places.
and now, ...
FORNITURE
So many things can be made out of paper! This time we are going to see how Élise Fouin, a French artist, makes furniture out of the material.
Using toilet paper and more things: Sakir Gokcebag, a turkish artist. Discover his artworks on his website.
Tuesday, 3 December 2013
A review for your first Technical Drawing Exam

Exam 3rd ESO (A, C, diver): December, 11th
Don't panic!
For your first Technical Drawing exam you will have to study vocabulary and constructions. You will find everything in the following links:
- The foundations of geometry.
- Simple elements.
- Paralllel and perpendicular lines.
- Line segment operations.
- Angles. Angles operations.
- Angle bisector.
- Perpendicular bisector.
- Thales theoreme. (NO)
Do you have any question? Use a comment in this article.
Saturday, 30 November 2013
Your tasks for Thanksgiving Day
Making of Warm and Cool turkeys

Your tasks: Warm and Cool turkeys

Thanksgiving turkeys - ORIGAMI on PhotoPeach
Making of and tasks
Your tasks: Warm and Cool turkeys
Thanksgiving turkeys - ORIGAMI on PhotoPeach
Making of and tasks
Wednesday, 20 November 2013
ORIGAMI
Origami (折り紙?, from ori meaning "folding", and kami meaning "paper"; kami changes to gami due to rendaku) is the traditional Japanese art of folding paper into a shape representing an object.
There is much speculation about the origin of Origami. While Japan seems to have had the most extensive tradition, there is evidence of an independent tradition of paperfolding in China (traditional funerals include burning folded paper), as well as in Germany, Italy and Spain among other places.
There is much speculation about the origin of Origami. While Japan seems to have had the most extensive tradition, there is evidence of an independent tradition of paperfolding in China (traditional funerals include burning folded paper), as well as in Germany, Italy and Spain among other places.
 |
| Akira Yoshizawa - Origami master showing us... a turkey! |
You don’t need any origami tools to fold paper. All you need is your hands, a piece of paper, and a flat surface to fold on. Easy. You can do it at home, you can do it at school (oops, did I really say that?). You can do it on the train, you can do it on the bus. You can do it in a coffee shop, you can do it in a restaurant or...

(see dollar-bill origami and napkin and towel folding).
(see dollar-bill origami and napkin and towel folding).
How to make origami:
There are many folding techniques that you need to learn to form a shape out of a piece of paper. Folding techniques. Two most important techniques are valley-fold and mountain-fold. At least, you must know what they are and you will have no problem of folding a simple origami model by using only these two folding techniques.
Wet folding origami is a relatively new way of folding paper. It was developed by origami master Akira Yoshizawa and it involves moistening the paper before you fold it. The resulting model has a softer, textured look with gentle curving lines.
Gilad’s web site shows the difference between a regular origami dog and a wet fold origami dog. Wow! [Puppy created by Francisco Javier Caboblanco; photo by Gilad Aharoni]

Interesting links for origami:
- Origami and pop-up books.
- OrigamiProject. To relax.
- Origami Maniacs.
- Last October, I visited 'ESTAMPA ARTE MÚLTIPLE' FAIR which was held in Matadero Madrid. I discovered a new exhibitor: MAATT. Maatt is brand-new company focused on home decoration objects. They exploit the possibilities of any material they find on the way. Their first collection is based on paper and it is called Animaatts, and the best is that it's a do it yourself!, of course, with instructions. I have seen this collection 'in situ' and it looks great!. It is a good example of 'minus is more'.

Discovering ORIGAMI -Volume with paper for Thanksgiving
This will be our second task for Thanksgiving Day. You only need two sheets of white paper to begin practising ORIGAMI.

The design requires two sheets of paper. The first is used to make the body. The second sheet is used to make the fanned tail. Is it possible to make the tail in two colors although the paper gets thick and it often slides out of place. Using tissue paper to make the fanned tail allows multiple sheets to be stacked and folded without it getting overly thick.
Kids Turkey
Part 1
Part 2:

Part 3:

These pictures are other types of turkey:


Kids Turkey

Part 1

Part 2:
Part 3:

These pictures are other types of turkey:
Thales theorem
A very funny way of explaining Thales Theorem:

Dividing a segment into several equal parts
We use Thales theorem to divide a given line segment into a number of equal parts with
compass and straightedge or ruler. By using a compass and straightedge construction, we
do this without measuring the line.

STEPS:
- Draw the given segment AB. This is the segment that we want to divide.
- From point A draw an oblique ray (r).
- Chose a measure with your compass and from point A draw arcs on the oblique ray as many arcs as parts you need.
- Join the last point of the oblique ray with point B.
- Draw parallels using your set square to the segment B7 from the other points on the ray.
Here we have divided the segment in seven parts, but you can divide the segment in as many parts as you need.

I think my construction is easier, but here you have another construction. In the applet we divide it into five parts but it can be any number. You will discover that both are the same!.
Friday, 15 November 2013
Angles. Angles operations
ANGLES
Definition: A shape, formed by two lines or rays diverging from a common point (the vertex).
Parts: vertex, legs (rays), interior, exterior.

TYPES OF ANGLES
 Animation.
COPYING OR TRANSLATING AN ANGLE
In Geometry, "translation" simply means moving without rotating, resizing or anything eles, just moving.
 STEPS:
This page shows how to copy an angle. Given an angle formed by two lines with a common vertex, this animation shows how to
construct another angle from it that has the same angle measure using a compass
and straightedge or ruler.Definition: A shape, formed by two lines or rays diverging from a common point (the vertex).
Parts: vertex, legs (rays), interior, exterior.

 |
| A triangle has three vertex |
COPYING OR TRANSLATING AN ANGLE
In Geometry, "translation" simply means moving without rotating, resizing or anything eles, just moving.
- Center the compass at vertex of the given angle and draw an arc intersecting both sides of it. Without changing the radius of the compass, center it at point V and draw another arc
- Set the compass radius to the distance between the two intersection points of the first arc.
- Now center the compass at the point where the second arc intersects ray V.
- Mark the arc intersection point 1.
- Join point V with point 1 so you get the equal angle.
ADDING UP ANGLES
 STEPS:
 STEPS:
The addition of two angles is another angle whose measure is the addition of the measures of those two angles.

- Copy angle A using translation of an angle.
- From this new angle copy angle B.
- The solution is angle C.
The sbtraction of two angles is another angle whose measure is the subtraction of the measures of those two angles.

- Copy angle B (the biggest one) using translation of an angle.
- From this new angle copy angle A.
- The solution is angle C.

- Try it yourself. Copying an angle.
Thursday, 14 November 2013
Warm and cool colours

- Warm and cool colors. The Artist's Toolkit.
- Make your abstract painting with Thisissand.com. You have to use ONLY WARM AND COOL colors.
Discovering warm and cool colours


Cool colours Warm colours

We are going to build this cute turkey made from your hadprints and footprints, cut out of construction paper. It will be a very nice Thanksgiving decoration for our Highschool.


Hand and Foot Turkey Craft
More ideas for Thanksgiving Day:
Tuesday, 12 November 2013
Line segment operations
COPYING A LINE SEGMENT
This page shows how to copy a line segment with compass and straightedge or ruler. Given a line segment, this shows how to make another segment of the same length.
This page shows how to copy a line segment with compass and straightedge or ruler. Given a line segment, this shows how to make another segment of the same length.
ADDING UP LINE SEGMENTS (in your notebooks)
The addition of two segments is another segment that begins at the origin of the first segment and ends at the end of the second segment.

STEPS:
- Draw a line (r).
- Draw a point A on it. (step 1 and 2 could be given)
- Measure the given segment AB with your compass.
- Draw an arc from A with that measure, so you get B.
- Measure the given segment CD with your compass.
- Draw an arc from B with that measure, so you get D.
- The solution is the segment AD.
SUBTRACTING LINE SEGMENTS (in your notebooks)

STEPS:
- Draw a line (r).
- Measure the longest segment with your compass, in our case is the segment CD.
- Draw a point C on r. (step 1 and 3 could be given)
- Draw an arc from dot C with the previous measure (the segment CD), so you get D.
- Measure the smallest segment with your compass, in our case is the segment AB.
- Draw an arc from D with that measure, so you get B.
- The solution is the segment CB.
Tuesday, 5 November 2013
Simple elements
LANGUAGE AND NOTATION OF BASIC GEOMETRY
POINT
A precise location or place on a plane. Usually represented by a dot, a cross or an x. Since a point is a place, not a thing, it has no dimensions. We label points with capital letters.
LINE
A geometrical object that is straight, infinitely long and infinitely thin. A line is one-dimensional. It has zero width. Using two points, we can create only one line.
VERTICAL AND HORIZONTAL LINES
A vertical line is one which runs up and down the page.

Besides, points P, M and Q are collinear, because they are on the same line segment.
INTERSECTION OF LINES
The point where two lines or two line segments meet or cross.
Animation.
PARALLEL LINES
Lines are parallel if they lie in the same plane, and are the same distance apart over their entire length. No matter how far you extend them, they will never meet.
 PERPENDICULAR LINES
A line is perpendicular to another if it meets or crosses it at right angles (90°).
Animation.
To review parallel and perpendicular lines, take a look at this video:
CIRCLE
Language and notation of the circle
A circle is a line forming a closed loop, every point on which is a fixed distance from a center point.
A circumference is how far you have to go around the circle or if you put a string on the circle, how long will the string have to be.
There is a difference between a circle and a disk. A circle is a line, and so, for example, has no area - just as a line has no area. A disk however is a round portion of a plane which has a circular outline. If you draw a circle on paper and cut it out, the round piece is a disk.
Radius animation.
Diameter animation.
Arc animation.
Sector animation.
Tangent animation.
Secant animation.
 A review of circles:
PLANE
A flat surface that is infinitely large and with zero thickness. The plane has two dimensions: length and width. But since the plane is infinitely large, the length and width cannot be measured.

PARALLEL PLANES
A flat surface that is infinitely large and with zero thickness. You can think of parallel planes as sheets of cardboard one above the other with a gap between them. Parallel planes are the same distance apart everywhere, and so they never touch.


INTERSECTING PLANES
If two planes are not parallel, then they will intersect (cross over) each other somewhere. Two planes always intersect at a line, as shown on the right.
This is similar to the way two lines intersect at a point.

SOLID GEOMETRY


POINT
A precise location or place on a plane. Usually represented by a dot, a cross or an x. Since a point is a place, not a thing, it has no dimensions. We label points with capital letters.
LINE
A geometrical object that is straight, infinitely long and infinitely thin. A line is one-dimensional. It has zero width. Using two points, we can create only one line.
 |
| In the figure above, the line PQ passes through the points P and Q, and goes off in both directions forever, and is perfectly straight. A line, strictly speaking, has no ends. |
VERTICAL AND HORIZONTAL LINES
A vertical line is one which runs up and down the page.
A horizontal line is one which runs left-to-right across the page. It comes from the word 'horizon', in the sense that horizontal lines are parallel to the horizon.
 |
| horizon |
RAY
A portion of a line which starts at a point and goes off in a particular
direction to infinity. One way to think of a ray is a line with one end. The point where the ray starts is called the endpoint. A ray is one-dimensional. It has zero width. A ray has no measurable length, because it goes on forever in one direction.
 |
| P is the endpoint |
LINE SEGMENT
A straight line which links two points
without extending beyond them. A line segment is one-dimensional. It has a measurable length, but has zero
width.
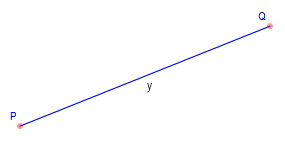 |
| P and Q are the endpoints of the line segment y |
MIDPOINT OF A LINE SEGMENT
A point on a line segment that divides it into two equal parts. The halfway
point of a line segment.
 |
| M is the midpoint P and Q are the endpoints of the line segment |
INTERSECTION OF LINES
The point where two lines or two line segments meet or cross.
Animation.
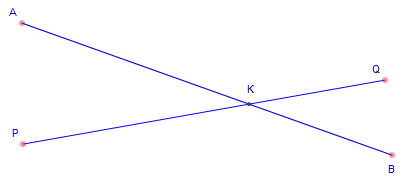 |
| In the figure above we would say that "point K is the intersection of line
segments PQ and AB". Another way it may be said is that "the line segment PQ intersects AB at point K". |
Lines are parallel if they lie in the same plane, and are the same distance apart over their entire length. No matter how far you extend them, they will never meet.
A line is perpendicular to another if it meets or crosses it at right angles (90°).
Animation.
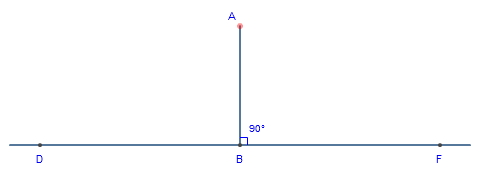 |
| AB is perpendicular to DF |
CIRCLE
Language and notation of the circle
A circle is a line forming a closed loop, every point on which is a fixed distance from a center point.
A circumference is how far you have to go around the circle or if you put a string on the circle, how long will the string have to be.
There is a difference between a circle and a disk. A circle is a line, and so, for example, has no area - just as a line has no area. A disk however is a round portion of a plane which has a circular outline. If you draw a circle on paper and cut it out, the round piece is a disk.
Radius animation.
Diameter animation.
Arc animation.
Sector animation.
Tangent animation.
Secant animation.
PLANE
A flat surface that is infinitely large and with zero thickness. The plane has two dimensions: length and width. But since the plane is infinitely large, the length and width cannot be measured.
PARALLEL PLANES
A flat surface that is infinitely large and with zero thickness. You can think of parallel planes as sheets of cardboard one above the other with a gap between them. Parallel planes are the same distance apart everywhere, and so they never touch.
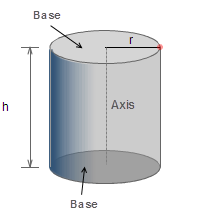 |
| The two bases of this cilinder are parallel planes |
INTERSECTING PLANES
If two planes are not parallel, then they will intersect (cross over) each other somewhere. Two planes always intersect at a line, as shown on the right.
This is similar to the way two lines intersect at a point.
SOLID GEOMETRY

When making technical drawings, REMEMBER:
- DATA: Use your 0,4 technical pen. (You will often find data given)
- AUXILIARY or CONSTRUCTRIONS LINES AND ARCS: Use your 0,2 technical pen.
- SOLUTIONS or RESULTS: Use your 0,8 technical pen.
If you are not using your technical pen but pencils:
- DATA: Use your HB pencil. (You will often find data given)
- AUXILIARY or CONSTRUCTRIONS LINES AND ARCS: Use your 2H-3H... pencil.
- SOLUTIONS or RESULTS: Use your HB pencil underlining twice.
Subscribe to:
Posts (Atom)